Table of Contents
Data recovery, auditing, and debugging are crucial for any data-driven business. Snowflake’s Time Travel feature offers a powerful way to access historical data without needing traditional backup and restore processes. But with power comes responsibility, especially when it comes to cost management.
In this guide, we’ll break down how Time Travel works, when to use it, and how to balance its benefits with innovative cost strategies.
What Is Time Travel in Snowflake?
Time Travel allows you to access previous versions of data, whether it’s a table, schema, or even a database, within a defined retention window. Think of it as an undo button for your data warehouse. Use cases include:
- Recovering accidentally deleted or modified data
- Auditing historical records
- Cloning datasets at specific past points
Related: Learn how Zero-Copy Cloning leverages Time Travel for fast, cost-efficient environment duplication.
How Time Travel Works
When enabled, Time Travel captures changes to data objects and stores them for a set period (up to 90 days on Enterprise Edition). You can query or clone data as it existed at any previous point within that retention window using SQL with AT or BEFORE clauses.
Example:
sql
CopyEdit
SELECT * FROM orders AT (OFFSET => -2*60*60);
This query fetches records from two hours ago.
Time Travel Retention Periods
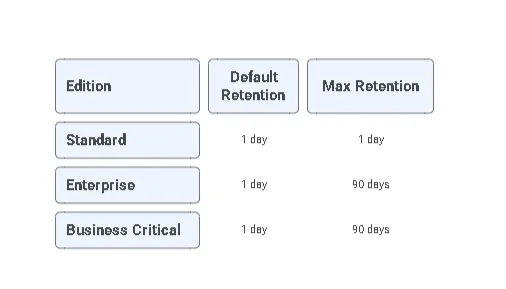
The cost implications of Time Travel are closely tied to how long your historical data is retained. Snowflake supports the following:

Retention can be set at the table or database level, depending on your use case.
Cost Implications of Time Travel
While Time Travel doesn’t incur compute costs for the feature itself, it does affect storage usage. Here’s how:
- Every data change is tracked via micro-partitioning and metadata.
- These historical partitions are stored as failsafe and Time Travel data.
- The longer the retention window, the higher the storage cost.
Key Cost Factors:
- Volume of data changes
- Frequency of updates
- Retention period length
Tip: Use Time Travel with short-lived data like transient tables to minimize long-term storage impact.
Best Practices to Optimize Time Travel Usage
To strike a balance between recoverability and cost, consider the following:
1. Set Minimal Required Retention
For most staging or dev environments, 1-day retention is sufficient. Limit 90-day retention to critical production datasets.
2. Monitor Storage Usage
Use ACCOUNT_USAGE views like STORAGE_USAGE_HISTORY to track growth due to Time Travel and adjust accordingly.
3. Use Transient Tables Where Applicable
Transient tables do not retain Time Travel history beyond their retention setting, making them ideal for temporary workloads.
4. Avoid Cloning Old Versions Unnecessarily
Cloning via Time Travel is efficient but still creates new metadata layers that contribute to usage metrics.
Learn more about managing Snowflake virtual warehouses to optimize compute alongside storage.
When Not to Use Time Travel
Avoid enabling long retention for:
- ETL staging tables
- Intermediate datasets
- Short-lived analytical outputs
Instead, rely on scheduled backups or Zero-Copy Clones for reproducibility when Time Travel isn’t storage-efficient.
Snowflake’s Time Travel is a robust feature for data recovery, version control, and cloning, but it must be used wisely. By controlling your retention settings and combining Time Travel with innovative practices such as transient tables and auto-suspend warehouses, you can maintain data flexibility without exceeding your budget.
Need help setting up an efficient Snowflake architecture?
FAQ
It’s used for recovering data, auditing historical records, and cloning datasets at specific past points for fast, cost-efficient environment duplication.
On Enterprise Edition, Snowflake’s Time Travel can retain historical data for up to 90 days, depending on the edition.
Cost implications are closely tied to the duration historical data is retained, influencing storage and resource usage.
